A laundry dryer ball or a dryer ball has been an amazing product. Those people who use the dryer balls know its benefits for sure. For those who are not aware of the wool dryer balls, we are here to help you out.
In fact, we make wool-felt laundry balls of compressed wool. The main purpose of the dryer ball is to reduce the drying time of your laundry. Together with that, it softens the clothes and linens. Not only this, you can get a lot more benefits from the laundry balls.
It is functional and you can also make it at home in an easy way. Of course, you are a creativity-loving person as you have shown interest over here. We, Felt and wool provide you with easy steps for making wool-felt laundry dryer balls at home. The steps are simple, sweet, and can get accomplished without much effort. You can enjoy the steps at your home during your leisure time as it enhances your creativity as well.
First of all, we should gather the following things to start the steps:
-
Merino wool roving ( 55 g )
-
A plastic doormat or mat
-
A bucket full of water
-
Laundry soap or liquid soap
-
Enough curtain netting, better if you have a large one
-
A bit large flat wooden plank
-
A tumble dryer
As you have all the things ready now, follow the steps below that are easy and quick:
Step 1: Weight the wool

The first step to start making wool felt laundry ball is to weigh the wool. As mentioned in the list above, you should have merino wool roving for a better result.
Why merino wool?
Merino wool is very fine soft wool that gets obtained from the breed of domestic merino sheep. Resisting its heavy and lumpy nature, merino is the world’s finest wool that is soft and light weighted. That’s the reason why it’s often used next to skin clothes as well. All the products that get manufactured in Felt and wool are also made up of pure merino wool. Which is why our products are of top quality.
You can choose your desired colored wool for manufacturing dryer balls. Even though white-colored dryer balls are preferable, one can use any colored wool. When you have finished selecting the wool, you have to weigh the merino wool roving. The weighted wool must be 55 grams to have properly sized wool-felted laundry dryer balls. If you are new to manufacturing dryer balls but want to make two or more, in the beginning, weigh the wool as per your need. For example: if you are willing to manufacture 4 dryer balls, weigh 55-gram wool for each of the dryer balls.
Step 2: Make roll like a ball

When the first step of weighing wool gets completed, get into the second step. Make rolls from the weighted wool as shown in the picture above. If you have weighted wool for four different balls, you should roll them out.
Generally, the laundry balls which we are going to make are 9 cm. For a 9 cm laundry ball, you have weight and rolled 55-gram wool. Afterward, you’ll be having four rolls ready then move towards the next step.
Step 3: Set the plastic doormat or mat
Setting or placing the doormat helps the excess water to drain out during the felting. Together with that, the balls or the wool rolls won’t get slipped while you are carrying out the further steps.
In case you do not have a plastic doormat or you do not want to use it then plastic mats could be a great substitute.
Step 4: Wet the rolls with water and liquid

As soon as you get done with making the rolls and setting down the doormat for laundry dryer balls, follow step 4. In step 4 as you have read above, you should now wet the wool rolls in the water. You can also wet the rolls by spreading the water from above. Make sure that the wool rolls get wet in a proper manner.
Fill a bucket with water and keep it near to you to the place where you are about to felt. You can use the required water from the bucket to wet the wool rolls. Any kind of felt item gets manufactured using hands. Thus, wetting with the water helps you in forming the shape of the laundry balls in a short time.
Along with water, pour a small amount of liquid soap or dishwasher soap into the rolls. If not, you can grate the laundry soap and mix it with hot water forming a soapy liquid yourself. As laundry soap seems to be kinder to your hands while felting, you can prepare soapy water. Or, you can prepare liquid yourself at home.
Step 5: Set in a net

Set the balls in curtain netting but keep in mind that the net should be enough. To set the wet balls, place them on the curtain netting. You can also use a mosquito net if it is large and usable.
So, when the wool rolls for the balls get placed on the net, hold it from the two sides covering them up. Afterward, shake it up. Keep shaking the balls inside the net until they get felted. They should absorb hot soapy liquid or liquid dishwasher.
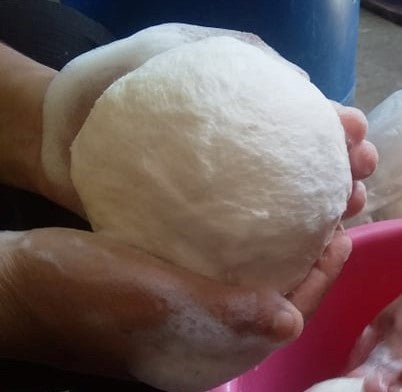
Step 6: Press the wool balls accurately

The next step you have to follow after setting the balls in a net is to press the wool balls. You should do it so that the wool gets felted forming a perfect laundry dryer ball.
Further, take out the wool balls from the net and place them over the plastic doormat. Or, you can use any kind of plastic mat that we set in step 3. You can also use bubble wrap instead of a plastic mat. The choice depends on you. Then, keep the balls together and press them with the wooden plank. Here, a chopping board can be a good substitute. Be careful that the wooden plank must be flat and should be enough to cover the laundry balls below. It should be a bit large and flat.
Get ready to press the balls now! Keep rolling the wooden plank over the wool balls until they get shaped. Also, the balls should be tight enough. You can place a heavy object or stone over the plank. We recommend you do it because it helps to give proper shape to the balls in a short time. During this step, you can take off any kind of dust or debris from the laundry ball.
Step 7: Check the final size

Step 7 is the important step you need to carry out for the manufacturing of wool-felt laundry dryer balls. After you carry out all the steps, the final step is to check the size of a ball.

As we weigh 55 grams of merino wool for the laundry dryer ball, the final size should be 9 cm. If you find a size more than that, you are not done yet. You should keep pressing the ball with a flat wooden plank as mentioned above. If you got the final size right, you’re done!
Step 8: Keep the dryer balls in a tumble dryer then sundry it
The right size means you did a great job! The last step is to keep the wool felt dryer balls in the tumble dryer. It helps in squeezing out the excess water from the laundry balls. Accompanied by that, the laundry ball can get dry sooner using the tumble dryer.
Likewise, as mentioned in the step you are now supposed to sundry your laundry balls. When it’s completely dried by the sun, your wool-felt laundry dryer ball is now ready.

Use it while doing the laundry. Along with making the drying time less, the wool-felt laundry dryer ball will soften the fabric. And prevents laundry from clumping together in a dryer.
Wish you are able to manufacture the best following the steps provided by us. Thank you for being with us! Get in touch with Felt and wool for interesting, enjoyable, and adorable wool felt products.

